


What's on Now
Introduction
This page shows what I'm currently working on. As soon as an item is finished, it moves to the corresponding page. Whenever I create or acquire new items, I'll post them here.
The wheels...
 There are parts you think, "I need to get the right type for them." Here you see a set of true classics. The front wheels are 15 x 7J, the rear 15 x 9J. The rims are original ATS rims. The front rims have been somewhat affected by road salt, so the plan is to polish the part that's currently aluminium coloured and repaint the yellow and black. But these rims will mean more work. The front has a total width of 1580 mm, and the total fender width is 1570 mm. So, the tires extend 5 mm on each side of the fenders. The rear is 1720 mm wide, and the total fender width is 1655 mm, meaning the wheels extend 35 mm on each side.
The seats...
 Here you can see the frame of one of the front seats. It's made of thin tubing and some connecting strips/plates. I copied the seat adjustment mechanism from the original so I can swap the seats with the original ones if they're having trouble during the MOT. The seat tilts, and the headrests are adjustable.
 Here I'm fitting the foam. Underneath each piece of foam is a plywood sheet. Each piece of foam is individually covered with a different color of fabric (green, yellow, red, or blue).
I'm also covering the side bolsters, like a luxurious roll bar cover.
The headrest is height-adjustable. I did this because I discovered the seat wouldn't tilt. In its original position, the headrest would hit the roof when tilted.
 Don't be scared, these are the colours that I want to use for the seat covering.
 The subframe and the frame for the rear seat are ready. The subframe is mounted to the mounting points of the horizontal support normally located under the rear seat and the rear seat belt mounts. The frame for the seat is made of 22mm tubing and 4 x 20mm steel strips.
 The photo shows the (yellow) cover plates with the amplifiers for the boom box. The two black "holes" next to the amplifiers are the mounting points for the safety belts.
The Twingo Look...
 I've always found the standard mirrors on a Beetle ugly. The Cal-look mirrors are nice, but not on a Baja. The Baby Turbos are decent, but I don't like the mounting method. The best-looking mirror was on the New Beetle prototype (the round mirrors), but unfortunately, the real New Beetle has a Golf-style mirror.
After a long search, I found an alternative. A nice round shape, larger than a standard mirror, and, as a bonus, electrically adjustable. The mirrors are from a 2004 Renault Twingo.
 But I had to make two adapters to mount the mirrors. After cutting the first prototype too short, I made a second one. Unfortunately, the pivot point of the Twingo mirrors isn't in a horizontal plane, so they hung down. But the third prototype was working.
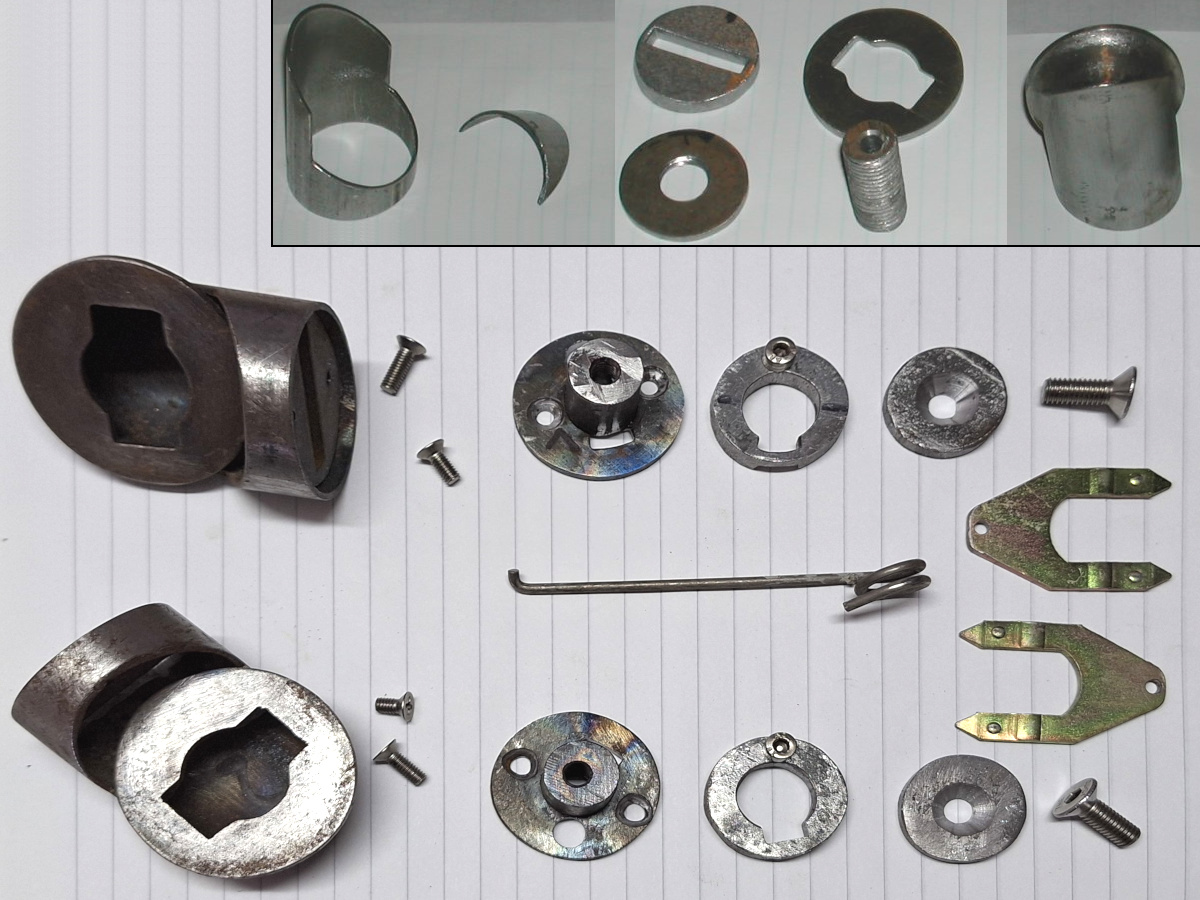 On the top-right, you can see the separate pieces that make the adapter. And all the way on the right, the adapter is welded together. In the lower part of the photo, you can see all the parts necessary for mounting the adapter to the door. The ring with the odd shaped centre hole will be welded into the door. The M4 socket head bolt will prevent the adapter from turning. The ring with the 16 mm boss connects to the adapter with two sunken head M4 bolts. Then the adapter will be secured with the sunken-head M6 bolt to the door from the inside. On the inside of the door, it was difficult to secure the adapter securely. This because I want to use a one-piece window, and the glass will be very close to the bolt. I used a thick washer and a sunken-head bolt to make the mounting as flush as possible.
The fork is used to connect the mirror to the adapter. And with the long pin it can be removed if necessary. There is also a channel to feed the wires through for the electric motors of the mirror, and for the heated mirror glass.
The front bumper
 I couldn't find a decent front bumper, so the solution was to make one myself. I started with some tubing and a 90-degree bend. Then I added some flat strip to mount the license plate, turn signals, and daytime running lights.
A tachometer and a 27mc transceiver
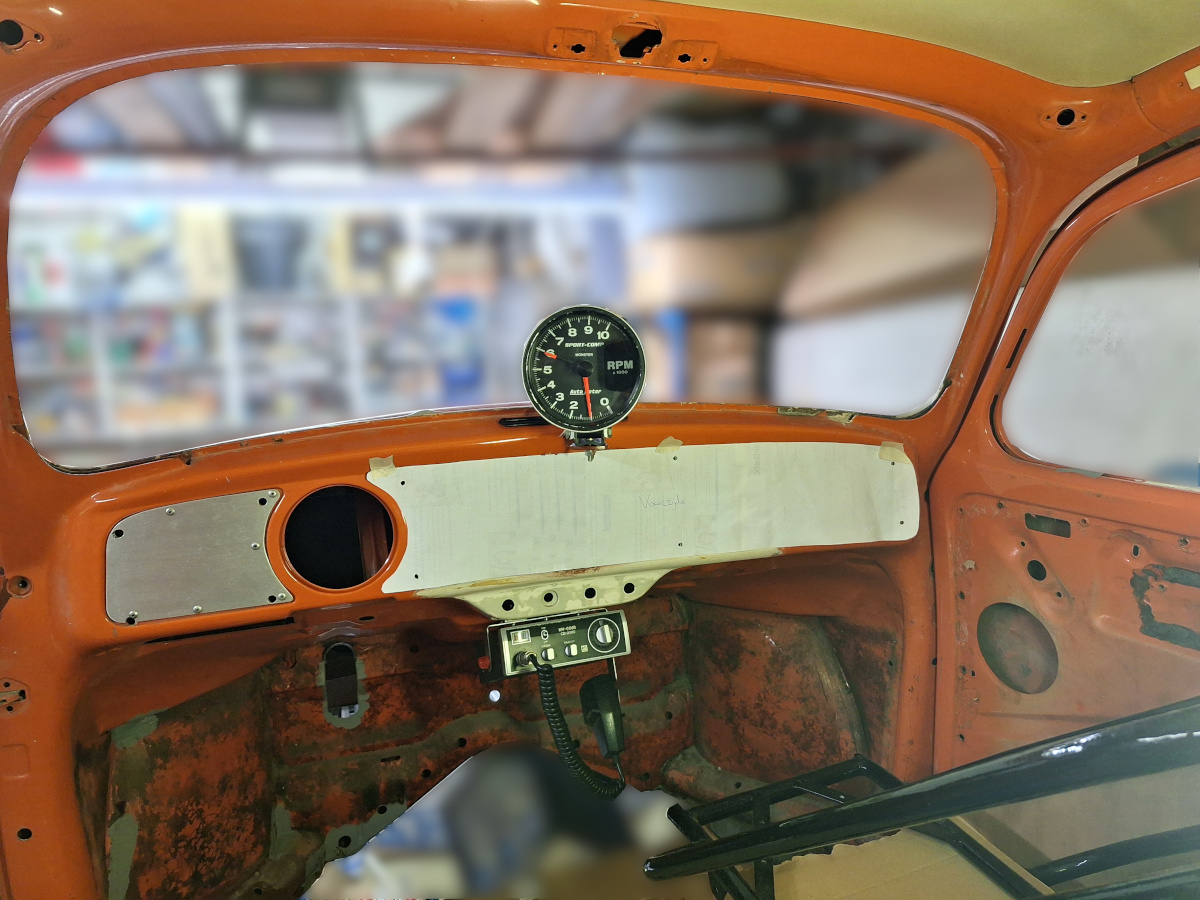 I always wanted a larger tachometer for my dashboard. Years ago, I bought an AutoMeter Monster Tach with a diameter of 127mm. The rev range is 0-10,000 rpm, which is a bit much, but it looks nice. Mounting it wasn't easy because I'm going to cover almost the entire dashboard with a sunrise; the only thing visible is the speedometer. I made a bracket that attaches to the back of the dashboard and extends through a small slot just below the air vent. Later, I'll add an adjustable shift light that will go on the top right of the tachometer.
I also have a 27mc transceiver mounted under the dashboard. It's a HY-COM CB2000 from the early 80s. I chose this transceiver because I had one when I was about 12 years old. Back then, the maximum transmission power was 0.5 watts, but it's now 4 watts. This is easily adjusted by replacing the output transistor with a more powerful one. For mounting, I made a bracket for the transceiver and the microphone.
The Hinges for the trunk lid
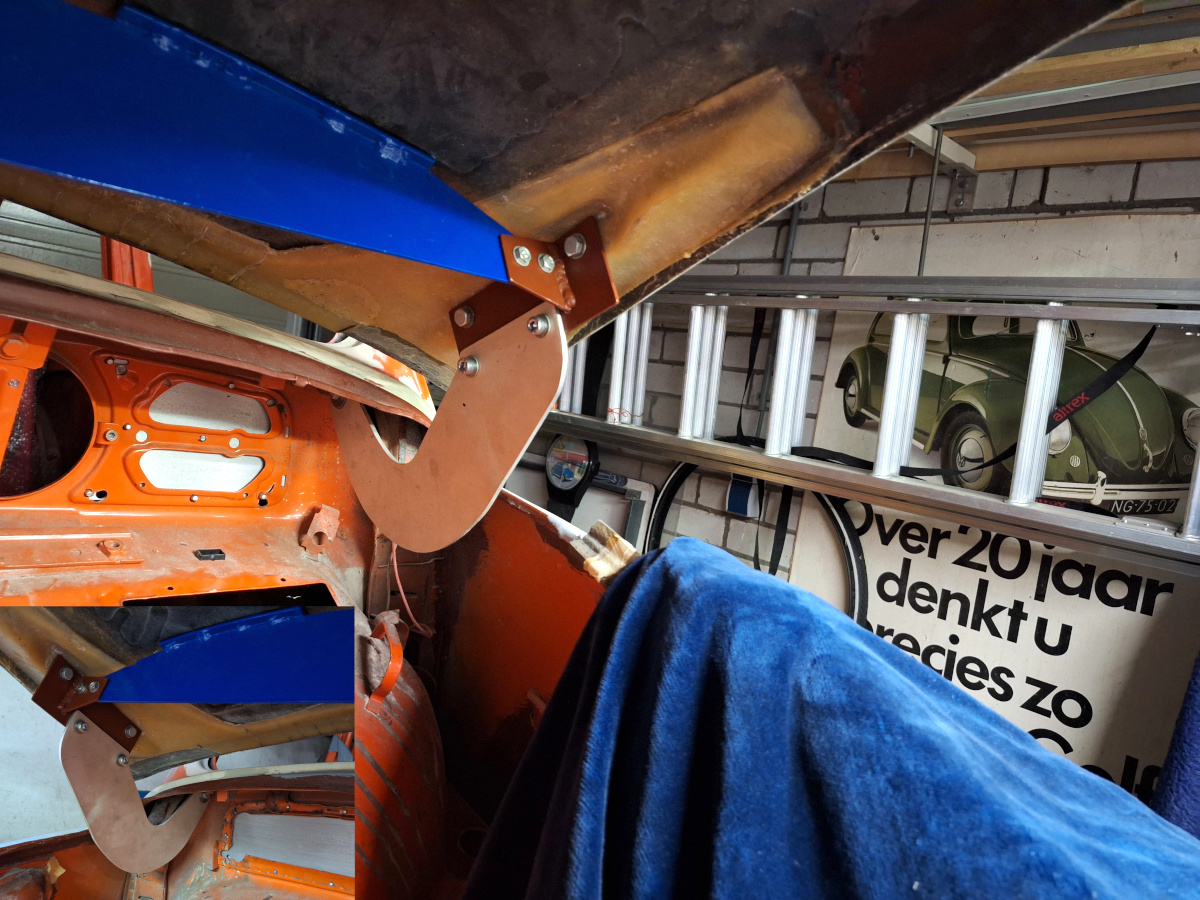 The Beetle's trunk lid is made of polyester. Besides the poor fit, the mounting is also inadequate. The trunk lid has a provision for mounting the standard hinges, but they don't really fit. Improving the fit didn't improve the trunk lid's stiffness either. I created a reinforcement (blue) from one hinge point to the other, which improved the fit of the trunk lid. This reinforcement is connected to two connectors (red), which are mounted to the existing mounting points on the trunk lid. Then I made two new hinges (aluminium) to attach the trunk lid to the car. The pivot point of the pivot point consists of an M8 bolt, a large washer, and a bronze bushing.
Now I need to find a way to attach the front of the trunk lid.
Third Brake Light
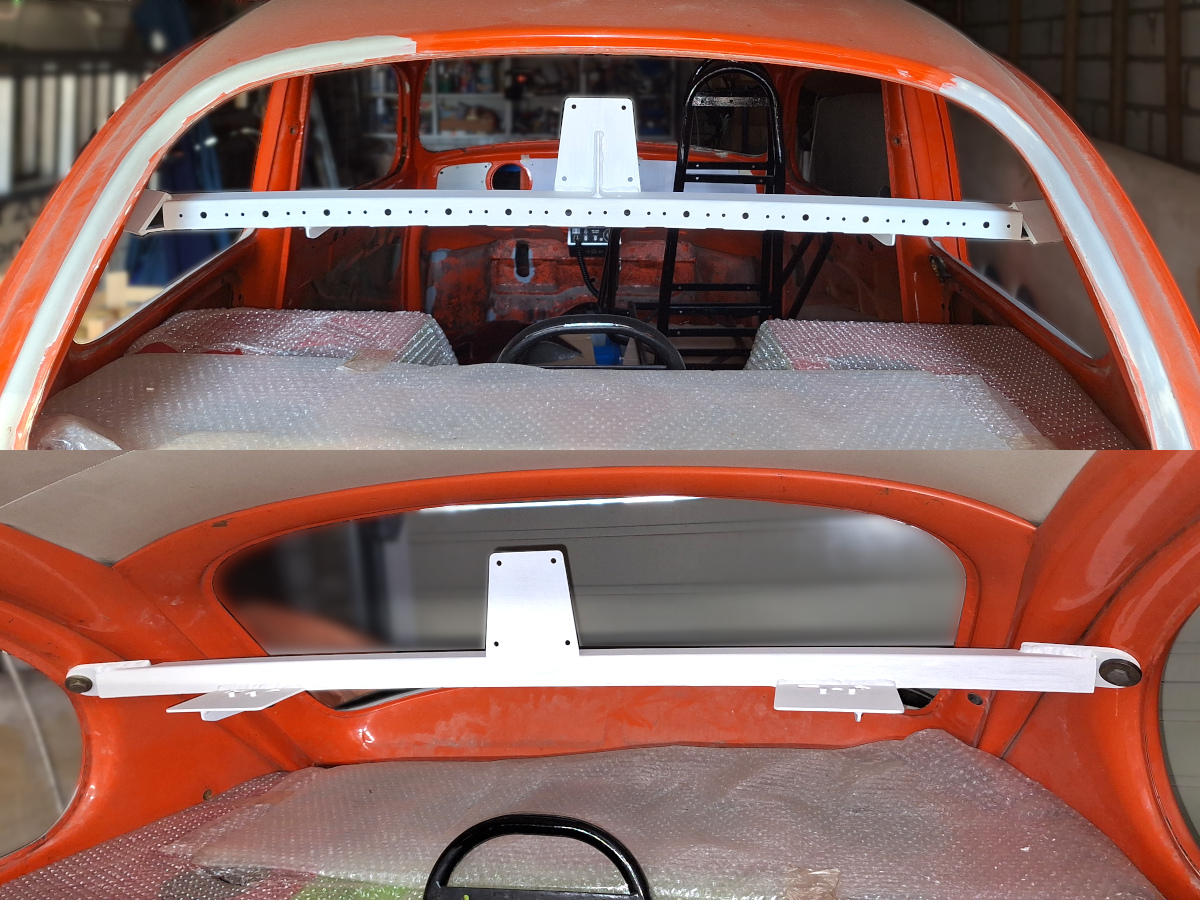 I really wanted to add a third brake light to the Beetle, but the question was where to place it. At first, I thought of putting it on the cover above the engine, but that wasn't a very aesthetically pleasing solution, and the bumper was a bit too low. The right location was roughly in the middle of the rear window.
After some further thought, I also decided to make a headrest for the rear seat. And I also had to correct a mistake from the past. I had bought two retractable seatbelts for the Beetle, specifically the ASM Autocontrol II from the Schroth company. At the time, I had planned to mount the retractor on the floor of the rear seat. However, it is better to have the retractor at approximately shoulder height.
In the end, I combined all the ideas, and this is the result. The bracket consists of a box section attached on both sides to the rear seatbelt mounting points. In the middle is a plate for the seat headrest, and on both sides next to it are mounting plates for the seatbelt retractors. On the rear of the box profile, there is space for 8 red LED lights that function as a third brake light. Next to the red LED lights, there are 3 LED lights on each side that will function as turn signals. The LED lights are controlled by a microprocessor, which allows for various effects.
Trunk lid lock
 After installing the trunk lid hinges, I started thinking about how to lock the trunk lid. The standard method on a Baja involves using a set of rubber T-handles that hook into metal holders. However, those look a bit ugly. I looked at some more luxurious versions where a pin protrudes through the trunk lid and is secured by a retaining spring. There are also versions where everything is concealed under a cover plate. But actually, I want something that isn't visible from the outside and can be unlocked from the inside of the Beetle.
What I also miss is a VW logo on the front of the Beetle. I have now decided to make a lock that can be unlocked from the inside of the Beetle, and to hide the trunk lid lock mounting behind the VW logo.
I have made a lock in which a metal strip is caught by a spring-loaded pawl. By pulling the cable, the pawl slides back, allowing the metal strip to be removed. The entire assembly is made of stainless steel to prevent the lock from rusting. Next, I made a bracket to which the lock can be attached.
A portion of the lock is also attached to the trunk lid itself, with the mounting concealed behind the VW logo. The lock features a spring mechanism so that it does not rattle while driving.
There is also a safety lock, so the trunk lid can only be opened a small amount when using the release. By pushing the safety lock slightly backward, you can open the trunk lid completely.
Modifying the fenders
 Modifying the fenders
The fiberglass parts of the Baja kit aren't exactly precision-made; to be honest, the fit is terrible.
I had to remove over a centimetre of material from the front fenders near the headlights. This meant losing about 25 cm of the mounting flange. Also, the original flange was too small to utilize the front mounting point. To restore the flange, I created two moulds that allow me to fabricate new flanges using polyester resin and fiberglass matting.
The rear fenders were acceptable, but they were designed for rear wheels about 7-8 inches wide. However, I really wanted a specific type of rim: the ATS Classics. These rims are 9.5 inches wide, meaning the tire tread protrudes about 32 mm beyond the fenders. I spent a long time considering how to solve this before finally deciding to cut into the rear fenders. I sawed through the fender at its flattest section and then built a jig to hold the two halves 35 mm apart. I plan to fill this open (red) section with polyester resin and fiberglass matting. The jig is for the right rear fender, and I intend to reuse it for the left side later.
The moulds are now ready for use, though I still need to bevel the edges of the existing fiberglass parts (at a 1:12 ratio) to ensure a solid bond with the new fiberglass material.
Cable routing for the doors
 Since I opted for electrically adjustable mirrors, I need to route the electrical wiring to the doors. I explored many options for concealing the wiring, but most were too complex to implement. One potential solution was to route the wiring through the door check mechanism (which prevents the door from opening too wide). However, I also purchased one-piece windows for the doors. This means the door check mechanism must be removed, as it would otherwise strike the glass when the door closes.
Ultimately, I chose a simpler solution. The wiring passes through the panels via two small aluminium blocks that also serve as a strap to limit the door's opening angle. You can see a white cable in the photo, but it will be replaced by a black 7-core cable. Three wires are required for mirror adjustment and two for the mirror heating; the spare wires can be used for features like central locking.
Modifying the seats
 In the past, I fabricated new seat frames for the Beetle. The frames were complete but not yet upholstered. Later, I purchased ASM Autocontrol II harnesses from the company Schroth, these are four-point harnesses equipped with an inertia reel. When I reached the stage of upholstering the seat frames, I began to wonder whether the harnesses would work well with them. The opening through which the harnesses pass was very tight, which would cause the straps to press firmly against the neck, likely making for an uncomfortable driving experience. To avoid any issues, I decided to modify the seat frames. I widened the gap between the seat and the headrest to provide more space for the harness. I began by welding two curved tubes onto the existing seat frame, then cut through and removed the original sections of tubing. To ensure structural integrity, I welded in small custom-fitted plates and sealed the open ends of the tubes.
Update: 2025-11-25 11:52:21